My very favorite ginger cookies are Trader Joes Triple Ginger Cookies. I like them because they are very small and loaded with ginger flavor. I like to trick myself with small cookies. Because they are small, I can eat, say, 20 of them. They are small, right? A container of Triple Ginger Cookies is devoured pretty quickly in my household. Unfortunately, I eat most of them.
Maida's favorite ginger cookies -- the ones that she and her mother used to make all the time and send home with all of the people who came through their house when she was growing up -- are very much like TJ's Triple Ginger Cookies. Except they are quite large. Extraordinarily large. So large, that I could only eat TWO at one sitting (really, two is too many).
I had high hopes of making these cookies for our GS camping trip, so we would have cookies and Big Daddy's Cake. The problem with these cookies is that the dough is very difficult to work with. It is easy to make (except for the tedious task of dicing the candied ginger). I find that with candied ginger, I always end up with less than I am supposed to have, because Maddy and I keep eating it while I'm cutting it up. I was worried when I finished dicing my 5 ounces of candied ginger that I had only really diced about 3 ounces and the cookies were not going to be gingery enough. This was not a legitimate concern.
The problem is that this dough is VERY soft. Even though I refrigerated the dough overnight, as Maida strongly recommended, the dough was extremely soft the next morning, and I really didn't feel like fooling around with it while I should be packing for a camping trip. So I left it to chill for another few days.
Once you pull the dough out of the refrigerator, you have to work very quickly to roll and cut the dough. And use lots of flour. You do not have time to go find your cookie cutters once the dough is rolled out. I used my huge Roul Pat for rolling this out, and still believe this is the best investment in cooking ever. I used a drinking glass to cut the cookies, and was tempted to crowed them onto the cookie sheet, but yielded to Maida's warning about how the cookies spread.
Man do they ever. The 3 inches cookies I cut with the glass ended up being 5 inch cookies. They are very flat, and crisp and perfect looking. And perfect tasting. Really, one cookie is enough. Pete says that half a cookie is enough. This would be my favorite cookie recipe too, if it were not for the fact that it is so difficult to roll out, and that TJ's Triple Gingers taste so similar.
And now I've made two of the 3 ginger cookies. These were my favorite so far.
Tuesday, February 9, 2010

Monday, February 8, 2010
Pecan, Peanut Butter, Banana Bread: Nutty as a fruitcake
Dad uses this expression, "nutty as a fruitcake" a lot, and it's never made sense to me. Why would a fruitcake be nutty? Wouldn't it be fruity? Wouldn't a nut cake be nutty? Well, this Pecan, Peanut Butter, Banana Bread is a nutty fruit cake. Very nutty indeed.
My girls have a favorite after-school snack: bananas spread with peanut butter and often rolled in chocolate chips. So I figured this bread would be popular with them. In fact, I added some chocolate chips to half the batter and made muffins out of that. Very yummy. Those are already gone.
Opinions vary on the balance of the ingredients here. One family member who wants to remain anonymous said that she doesn't really like pecans or walnuts or whatever, but that they taste good with all the banana and peanut butter and chocolate. I personally feel that the pecans dominate--in a good way, since I love toasted pecans--and that the banana and peanut butter are just kind of background flavors. Which is OK, but if you want banana bread, you should try Elise's. Simple and perfect (especially if you add coconut and/or chocolate chips).
 OK, a note about the ingredients. I'm starting to enjoy composing these shots. I admit to having emptied my freezer and at least half-filled a suitcase with nuts and dried fruits that are difficult to get in France. Thus the Trader Joe's pecans. Not pictured are the Louisiana pecans that I used up. They were in larger pieces and contributed more to the bread, I thought.
Check out the tiny jar of Skippy that cost 3.40 Euros ($4.66 according to my currency converter). You could probably buy the economy-sized twin pack for that much in the States. Oh, well. Also check out the nutmeg--"Muscade." You buy the whole nutmegs, and they come with this adorable tiny nutmeg grater. Very convenient.
 So here are all the ingredients mixed together. I'm about to add a handful of chocolate chips for the muffins.
 The batter hits the oatmeal-encrusted pan.
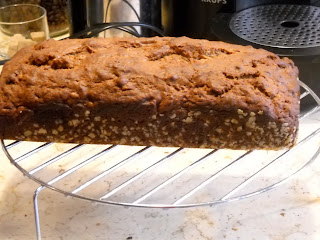 The oatmeal makes the bread look so healthy, don't you think?
 Look at all those dominating pecans. Crunchy and delicious.
Here's the recipe, if you want to get nutty:
Pecan, Peanut Butter, Banana Bread
6 oz. pecan halves or large pieces
3 oz. (6 T.) butter, room temperature
1 t. baking soda
1/2 t. salt
1/4 t. nutmeg
1/2 t. vanilla (optional--I added some because I like it)
1/2 c. (4.5 oz.) smooth peanut butter
1 scant cup (6.5 oz.) dark brown sugar
2 large eggs (mine were medium, and the bread turned out fine)
2-3 bananas (8 oz. peeled), mashed with a fork to a chunky paste
1 c. (4 oz.) sifted flour
1 c. (4.5 oz.) sifted whole wheat flour
1/4-1/2 c. chocolate chips (optional)
Heat the oven to 375. Get out a loaf pan and some muffin pans--or if you happen to have two small loaf pans (maybe the disposable aluminum kind), that's what Maida calls for. Grease whatever pans you are using and sprinkle them with wheat germ or dry bread crumbs or oatmeal. Set them aside. When the oven is preheated, or just about, put the pecans on a baking sheet and toast them for about 7 minutes. Set aside to cool while you make the batter.
Cream the butter with the baking soda, salt, and nutmeg (and vanilla) until fluffy. Then add the peanut butter and beat that well. Gradually add the sugar and give that a good long beating--at least 2 minutes--and then add the eggs one at a time, beating well after each. If you're using a hand mixer, your arm should hurt at this point. Feel the burn!
Beat the bananas into the mixture until they are nicely incorporated, and then add the flours on low speed (or by hand) just until everything is just about smooth. Then add the pecans (and optional chocolate chips) by hand. Distribute the batter among the pans you've prepared--I got 1 loaf and 4 large muffins--and put them in the oven. Set the timer for 15 minutes. When it goes off, turn the oven down to 350 and set the timer for another 10 minutes if you've got muffins; 35-40 minutes if you've got loaf pans. In other words, muffins should take a total of 20-25 minutes; the loaves will take a total of 50-55 minutes (but I would check after 45 in case your oven runs hot like mine). In any case, when a toothpick comes out clean, you know the bread is done. Let cool in the pan for 10 minutes, then unmold onto a folded towel in your hand (good tip, Maida!) and then onto a rack. Let cool as long as you can stand it, then enjoy!
My girls have a favorite after-school snack: bananas spread with peanut butter and often rolled in chocolate chips. So I figured this bread would be popular with them. In fact, I added some chocolate chips to half the batter and made muffins out of that. Very yummy. Those are already gone.
Opinions vary on the balance of the ingredients here. One family member who wants to remain anonymous said that she doesn't really like pecans or walnuts or whatever, but that they taste good with all the banana and peanut butter and chocolate. I personally feel that the pecans dominate--in a good way, since I love toasted pecans--and that the banana and peanut butter are just kind of background flavors. Which is OK, but if you want banana bread, you should try Elise's. Simple and perfect (especially if you add coconut and/or chocolate chips).
 OK, a note about the ingredients. I'm starting to enjoy composing these shots. I admit to having emptied my freezer and at least half-filled a suitcase with nuts and dried fruits that are difficult to get in France. Thus the Trader Joe's pecans. Not pictured are the Louisiana pecans that I used up. They were in larger pieces and contributed more to the bread, I thought.
Check out the tiny jar of Skippy that cost 3.40 Euros ($4.66 according to my currency converter). You could probably buy the economy-sized twin pack for that much in the States. Oh, well. Also check out the nutmeg--"Muscade." You buy the whole nutmegs, and they come with this adorable tiny nutmeg grater. Very convenient.
 So here are all the ingredients mixed together. I'm about to add a handful of chocolate chips for the muffins.
 The batter hits the oatmeal-encrusted pan.
 The oatmeal makes the bread look so healthy, don't you think?
 Look at all those dominating pecans. Crunchy and delicious.
Here's the recipe, if you want to get nutty:
Pecan, Peanut Butter, Banana Bread
6 oz. pecan halves or large pieces
3 oz. (6 T.) butter, room temperature
1 t. baking soda
1/2 t. salt
1/4 t. nutmeg
1/2 t. vanilla (optional--I added some because I like it)
1/2 c. (4.5 oz.) smooth peanut butter
1 scant cup (6.5 oz.) dark brown sugar
2 large eggs (mine were medium, and the bread turned out fine)
2-3 bananas (8 oz. peeled), mashed with a fork to a chunky paste
1 c. (4 oz.) sifted flour
1 c. (4.5 oz.) sifted whole wheat flour
1/4-1/2 c. chocolate chips (optional)
Heat the oven to 375. Get out a loaf pan and some muffin pans--or if you happen to have two small loaf pans (maybe the disposable aluminum kind), that's what Maida calls for. Grease whatever pans you are using and sprinkle them with wheat germ or dry bread crumbs or oatmeal. Set them aside. When the oven is preheated, or just about, put the pecans on a baking sheet and toast them for about 7 minutes. Set aside to cool while you make the batter.
Cream the butter with the baking soda, salt, and nutmeg (and vanilla) until fluffy. Then add the peanut butter and beat that well. Gradually add the sugar and give that a good long beating--at least 2 minutes--and then add the eggs one at a time, beating well after each. If you're using a hand mixer, your arm should hurt at this point. Feel the burn!
Beat the bananas into the mixture until they are nicely incorporated, and then add the flours on low speed (or by hand) just until everything is just about smooth. Then add the pecans (and optional chocolate chips) by hand. Distribute the batter among the pans you've prepared--I got 1 loaf and 4 large muffins--and put them in the oven. Set the timer for 15 minutes. When it goes off, turn the oven down to 350 and set the timer for another 10 minutes if you've got muffins; 35-40 minutes if you've got loaf pans. In other words, muffins should take a total of 20-25 minutes; the loaves will take a total of 50-55 minutes (but I would check after 45 in case your oven runs hot like mine). In any case, when a toothpick comes out clean, you know the bread is done. Let cool in the pan for 10 minutes, then unmold onto a folded towel in your hand (good tip, Maida!) and then onto a rack. Let cool as long as you can stand it, then enjoy!
Thursday, February 4, 2010
Brandied Apples
Yes, Alicia, more apples. But these are sautéed, only require two apples, and only take about 10 minutes to put together. And we all wished there were more!
But before I write more about this recipe, I want to tell you about the apple guy. No, not Steve Jobs--the apple guy at the Friday market in Montrichard (the larger village where Claire goes to school).
Everyone has heard of, or seen, or seen pictures of French food markets. They're beautiful--all the produce and meat and fish and cheese presented just so. All true, especially in Paris. But the markets, especially in Paris, are not farmer's markets but food markets--the vendors go to the big wholesale market to buy their wares. Even though they tend to get the freshest and nicest produce and such, it's not as if they produced it themselves.
But here in the countryside, it's a bit different. There are stands with shiny, perfectly presented produce that probably comes from the Rungis (central) market. But you also see a lot of rather scruffy produce being sold by somewhat scruffy people. It's local, it's fresh, and it's not always shiny and perfect. One lady was selling carrots, among other vegetables. One bin had clean, shiny carrots; the other bin had carrots covered in dirt. I asked what the difference was--the price was the same. "Well, these carrots (the clean ones) come from Mont St.-Michel. These other ones come from the garden, you know? And they keep better with the dirt on them." I bought the dirty ones, and they're delicious.

Thus the apple guy. It turns out that the Touraine, the region we're in, is a big producer of apples. He sells 6-7 different kinds of apples and pears, and has firm opinions about which ones are good and which not so much. I like to try different types, but he has been somewhat disapproving about some of my choices: "The Ariane? It's kind of sour, kind of mealy. Don't you want a Braeburn instead?" I insist on trying a few ("Why five apples? What's with the number five?") as well as some Braeburns and others, and of course he's right. The Ariane is not a great apple. At the end of our jocular struggle for him to sell me his best apples and me to want to try the mediocre ones, I end up with 5 kilos of apples and pears, which he sells to me for 5 Euros (about $7.50). And most of them are delicious! But no Honey Golds there...
Since I didn't like eating those Arianes as is, I decided they would go into the Brandied Apples. After all, there's nothing like butter, sugar, cream, and booze to make a mediocre apple something special!

So here are the ingredients. Once again, this is a pretty straightforward recipe in terms of ingredients.
 The apples hit the pan! Maida wants you to slice the apples and then use two cookie cutters to cut them into perfect rings. Guess what? I don't have any cookie cutters, so I did it by hand. You see the mixed results.
 Fire!! I'm terrified of flambéeing, so Sami came to the rescue. Maida was right that this large amount of Calvados makes a huge flame. Too bad Pyromaniac Claire was not in the room to witness this!
 And here they are, in their creamy, caramelized goodness. There were three servings like this. Maybe it's good to be restrained like that, and more apples would not have fit in the pan, but it seemed a little skimpy. Maybe with a scoop of ice cream...
Here's the recipe. It was great with mediocre apples, and would most likely be even better with wonderful apples.
Brandied Apples
2 large, tart apples (maybe a Pink Lady or a Braeburn)
1 T. butter
1/4 c. (1.75 oz.) sugar (I eyeballed this, but I'm pretty sure I used less)
2 oz. (1/4 c.) Calvados or other brandy (Maida says rum is OK, too)
1/2 c. cream
Make sure you have all your ingredients out and measured--this goes fast.
If you don't have two round cookie cutters (a large one about the circumference of the apple and a quite small one for coring), peel the apples. Cut off the very top and bottom of the apples and then slice into 4-5 rounds. If you've got the cookie cutters, use the big one to cut the peel off the apples and the small one to cut the core out. You should have beautiful, even rings. If you don't have the cookie cutters, just do your best to cut the core out without breaking the ring.
Now set a frying pan over medium-high heat and melt the butter in it. When the butter is no longer foaming, put in the apples in one layer. Sprinkle them with the sugar. Let them cook about 2 minutes per side, until they're just tender. Then get your Calvados and a match ready. Pour in the Calvados, light it, and stand back--that's one big flame. Swirl the pan, if you dare, until the flame has died down, then add the cream. Let that cook down just a bit, then remove the apples from the pan with a slotted spoon--if you're organized enough, try to get them straight onto the serving plates. Then let the cream cook down a bit more until it's a nice light caramel color. Pour the cream on the apples (there isn't a lot of sauce), and chow down. Maida says you can serve this with ice cream or sour cream. We had crème fraîche available, but it didn't seem necessary. But probably good vanilla ice cream would be a nice temperature contrast. Enjoy your simple but showy winter dessert!
But before I write more about this recipe, I want to tell you about the apple guy. No, not Steve Jobs--the apple guy at the Friday market in Montrichard (the larger village where Claire goes to school).
Everyone has heard of, or seen, or seen pictures of French food markets. They're beautiful--all the produce and meat and fish and cheese presented just so. All true, especially in Paris. But the markets, especially in Paris, are not farmer's markets but food markets--the vendors go to the big wholesale market to buy their wares. Even though they tend to get the freshest and nicest produce and such, it's not as if they produced it themselves.
But here in the countryside, it's a bit different. There are stands with shiny, perfectly presented produce that probably comes from the Rungis (central) market. But you also see a lot of rather scruffy produce being sold by somewhat scruffy people. It's local, it's fresh, and it's not always shiny and perfect. One lady was selling carrots, among other vegetables. One bin had clean, shiny carrots; the other bin had carrots covered in dirt. I asked what the difference was--the price was the same. "Well, these carrots (the clean ones) come from Mont St.-Michel. These other ones come from the garden, you know? And they keep better with the dirt on them." I bought the dirty ones, and they're delicious.

Thus the apple guy. It turns out that the Touraine, the region we're in, is a big producer of apples. He sells 6-7 different kinds of apples and pears, and has firm opinions about which ones are good and which not so much. I like to try different types, but he has been somewhat disapproving about some of my choices: "The Ariane? It's kind of sour, kind of mealy. Don't you want a Braeburn instead?" I insist on trying a few ("Why five apples? What's with the number five?") as well as some Braeburns and others, and of course he's right. The Ariane is not a great apple. At the end of our jocular struggle for him to sell me his best apples and me to want to try the mediocre ones, I end up with 5 kilos of apples and pears, which he sells to me for 5 Euros (about $7.50). And most of them are delicious! But no Honey Golds there...
Since I didn't like eating those Arianes as is, I decided they would go into the Brandied Apples. After all, there's nothing like butter, sugar, cream, and booze to make a mediocre apple something special!

So here are the ingredients. Once again, this is a pretty straightforward recipe in terms of ingredients.
 The apples hit the pan! Maida wants you to slice the apples and then use two cookie cutters to cut them into perfect rings. Guess what? I don't have any cookie cutters, so I did it by hand. You see the mixed results.
 Fire!! I'm terrified of flambéeing, so Sami came to the rescue. Maida was right that this large amount of Calvados makes a huge flame. Too bad Pyromaniac Claire was not in the room to witness this!
 And here they are, in their creamy, caramelized goodness. There were three servings like this. Maybe it's good to be restrained like that, and more apples would not have fit in the pan, but it seemed a little skimpy. Maybe with a scoop of ice cream...
Here's the recipe. It was great with mediocre apples, and would most likely be even better with wonderful apples.
Brandied Apples
2 large, tart apples (maybe a Pink Lady or a Braeburn)
1 T. butter
1/4 c. (1.75 oz.) sugar (I eyeballed this, but I'm pretty sure I used less)
2 oz. (1/4 c.) Calvados or other brandy (Maida says rum is OK, too)
1/2 c. cream
Make sure you have all your ingredients out and measured--this goes fast.
If you don't have two round cookie cutters (a large one about the circumference of the apple and a quite small one for coring), peel the apples. Cut off the very top and bottom of the apples and then slice into 4-5 rounds. If you've got the cookie cutters, use the big one to cut the peel off the apples and the small one to cut the core out. You should have beautiful, even rings. If you don't have the cookie cutters, just do your best to cut the core out without breaking the ring.
Now set a frying pan over medium-high heat and melt the butter in it. When the butter is no longer foaming, put in the apples in one layer. Sprinkle them with the sugar. Let them cook about 2 minutes per side, until they're just tender. Then get your Calvados and a match ready. Pour in the Calvados, light it, and stand back--that's one big flame. Swirl the pan, if you dare, until the flame has died down, then add the cream. Let that cook down just a bit, then remove the apples from the pan with a slotted spoon--if you're organized enough, try to get them straight onto the serving plates. Then let the cream cook down a bit more until it's a nice light caramel color. Pour the cream on the apples (there isn't a lot of sauce), and chow down. Maida says you can serve this with ice cream or sour cream. We had crème fraîche available, but it didn't seem necessary. But probably good vanilla ice cream would be a nice temperature contrast. Enjoy your simple but showy winter dessert!
Wednesday, February 3, 2010
Apples, and Doughnuts, and Cake, OH MY!
Maria has been baking. Maria has been blogging. Maria has been taking absolutely spectacular photos of her French kitchens and French baking ingredients.
Alicia has not been baking. Alicia has not been blogging. Alicia has let the battery run out on her camera and doesn't even remember how to take a picture.
So my posts will definitely not be so entertaining as Maria's. But if I don't write about what I've been doing, I will get even further behind in the race through Maida's book, so I better at least write about what I HAVE accomplished!
American Beauty Apples
At the beginning of January, my friend and co-GS leader Lisa asked me if I wanted to participate in the 3-Day Breast Cancer walk. Of course I said yes. I would never pass up an opportunity to walk 60 miles. Now if I didn't have to raise $2,300 it would be perfect. Of course Natalie wants to do it too. So make that $4,600. And Maddy is considering coming home from college for that weekend too. So that will be $6,900. Hmm.
Even though the walk isn't until mid-November, we decided to start our training with a 5-mile walk around Lake Miramar on the second weekend in January. The night before the walk, I made the American Beauty Apples.
As pointed out by Maria, things have changed since Maida wrote the book. I do recall being able to purchase boxes of highly sweetened raspberries. I couldn't find them -- even though I went to a questionable market which carries old-fashioned things. I did find a bag of "sweetened" raspberries however, so figured they would be good. And I don't think Rome Apples exist anymore. I bought some expensive type of apple called Honey Gold which looked very similar to what I remember Rome Apples looking like (very round and very red.) 6 Honey Gold apples set me back $12!
I was not a fan of this recipe. It involved coring apples, which is a job that I consider truly awful. The core never seems to come out cleanly, so there are always little seeds and stuff stuck in the apple after you are done. And then you still have that little butt end of the apple left, and if you get it in your mouth while you are eating the apple it is a most unpleasant experience. And then you had to thaw the raspberries and shove them through a sieve, which took FOREVER. I realized, after I was done, that I should have used the food mill. Instead, I got carpal tunnel syndrome mashing the berries through the super fine sieve I have. Not too much fun.
The baking of these apples also required a lot more work than I enjoy, because I kept having to open the oven, take the apples out, "baste" them, and put them back in. This continued for a while until the red raspberry puree had congealed around the apples. The apples looked quite spectacular actually. Of course, I didn't take a picture of them, so you have to take my word for it.
I think of baked apples as something that you eat hot. But Maida specified that these apples were to be eaten cold. I left them on the counter to cool, but then forgot about them and went to bed. Fortunately Maddy spotted them on the counter before she went to bed and shoved them into containers and put them in the refrigerator. Good job Maddy.
Next morning was our training walk. When we got up in the morning, I had received a text message saying that the walk was going to begin 1/2 hour earlier than I thought it was going to start. AAAAH! Maddy, Natalie and I threw on our clothes, washed our faces and brushed our teeth, and shoved a couple apples into bowls for eating in the car while we rushed to Lake Miramar.
The apples tasted like cold applesauce covered in raspberry jam. I like applesauce. I like raspberry jam. But I apparently don't like the combination. They were alright, but nothing to write home about (or even to blog about.). I ended up throwing away 4 of the 6 apples (so $8 worth of apples). I couldn't get myself to sell them to anybody else. I'm hoping there aren't anymore baked apple recipes in the cookbook. I haven't looked yet.
Doughnuts
I made the doughnuts on January 24. I was determined to make the doughnuts that weekend. I had told the girls I was going to be making doughnuts, and that was definitely going to happen. I didn't get to it on January 23 because I ended up running all over San Diego trying to buy Maddy a Mac laptop at the "educational discount" price. That was a complete nightmare. By Saturday evening, I was exhausted and didn't feel like doing anything else. When Cassandra suggested that I should probably start the doughnuts that night, because "they might take a while," I told her that I would make them on Sunday. I didn't even look at the recipe. Probably because I knew she was right.
So when Sunday morning dawned, and I looked at the recipe, I discovered that Cassandra was, in fact, right. These doughnuts require a great deal of downtime. If I had started on them the night before, I would have been pulling the dough out of the refrigerator and cutting out doughnuts for their final rise. Instead, I was boiling potatoes.
My first sign that things were not going to go well with the doughnuts was that the yeast in the measuring cup really didn't rise too far. Nope. Not even close to double. But it did rise a little bit. That's what I kept telling myself. And the package wasn't expired. And I was NOT going to go out and buy new yeast. I got through the whole potato ricing, mixing, kneading process (on my new Roul Pat, which is the best cooking thing I have ever purchased in my life), and stuffed the bowl of dough into the oven with the light on so it could rise.
At that point, Pete suggested that we all pile into the car and drive up to the snow. In San Diego, this is a big event. People pull out the sleds from the mothballs, load up coolers, bring chairs and tables, and drive to the snow in droves. We just don't get snow that often. It had been snowing quite a bit that week in the mountains, and everything we heard said that you needed chains. I didn't have chains. So while Pete drove off to find chains, I took Maddy to the mall (an hour before it even opened) because she had decided to go to the mall instead of to the snow. A decision which I still do not understand.
When I got back from the mall, I looked at the bowl of dough. It really had not budged an inch. But I told myself it had risen a little bit, maybe, and "punched" it down (it didn't take very much effort to get it to go down . . .) and put it in the refrigerator for the "curing" phase.
And we went up to the snow. You didn't need chains. And there were about a million people up there. Thank god we chose to drive through Julian because the other road to the snow was backed up about 20 miles. We had a blast! We didn't have sleds in mothballs, so we just had a giant snowball fight.
When we got back from the snow, I pulled that bowl of dough out of the refrigerator and Sam and I cut out the doughnuts. I put the doughnuts onto cookie sheets and put them back into the oven to rise.
There was a little movement. Maybe. It was now an hour past the time when I was supposed to get the girls back to Stuart (he had given me permission to get them back late due to the doughnuts). I pulled the really super flat doughnut circles out of the oven and started frying them. My oil was apparently too hot, because they came out of the oil VERY BROWN. But they were puffy.
It was then I realized that I had no powdered sugar and could not make the glaze. Using Maria's technique, I just rolled the hot doughnuts in sugar.
So my doughnuts looked like the plain cake doughnuts they sell at doughnut shops covered in sugar. They were not large and puffy. They were kind of low and flat and really brown.
But apparently they were good. I forgot one part of this story. I hate doughnuts. I won't even eat a doughnut hole. Everybody else, though, said they were tasty. I gave almost all of them to the girls and don't know what happened to them. I brought the rest to work, and know that Ben ate at least one. He said it was like a Beignet. I guess that's good praise from a boy from Louisiana.
Big Daddy Cake
I made this one last Friday night. The Girl Scout troop was going camping and I recall Maria saying that this was a good cake to make if you have a lot of people to feed. It wasn't a LOT of people, but more than usual.
This cake is pretty fun to make, but uses a lot of butter. Kind of a scary amount, actually. And I was thinking my chocolate bars were 3 oz, and so used two of them to make up the 6 oz I needed for the tunnel of fudge. Oops. They were 4 oz. 8 oz. of chocolate in the tunnel of fudge, making for an even fudgier tunnel.
Although I buttered my pan and covered it with pecan dust, the cake did not want to come out of the pan on Friday night after the requisite cooling period. Because I started on the cake after work, and it takes a long time to bake, I had already stayed up way later than I wanted to. So I just left the cake upside down on the cake plate hoping that the forces of gravity would slide the cake out of the pan. No such luck.
So Saturday morning, I was faced with one of those situations where you know you need the cake to come out of the Bundt pan, you know it is almost impossible to get stuck cakes out of Bundt pans due to all the nooks and crannies in such pans, and you want a perfect looking cake to take a picture of. Oh -- that would be Maria, because I have stopped taking pictures for some reason. But I did want a perfect cake anyway.
I finally settled on my flexible cake frosting spatula, which I slowly worked around the cake. After about 20 minutes of this (20 minutes which I should have spent packing and getting out camping supplies and chopping vegetables and things in preparation for the camping trip), I got the cake out in one beautiful piece. Patience is a virtue. Just not my virtue.
Now 20 minutes behind on my preparations for the camping trip, I enlisted the support of my 3 able-bodied children to do things such as chop potatoes, clean out the car, and restock my camp kitchen, and made the glaze for the cake. This time I used the proper amount of chocolate, but it still looked like a lot of glaze. Cake done, I helped pack of the car and hit the road to Lake Perris. Which I have decided is one of my favorite campgrounds -- if you go in January.
We broke the cake out during the late afternoon and everybody had slices -- even Pete, who hates desserts. Everybody seemed to like the cake. Especially Maddy and I, who had more the next day for lunch. After skydiving. Ok, ok. Indoor skydiving. Really works up an appetite, let me tell you.
I liked this cake. The cake part reminded me of my favorite cake when I was a kid -- Rae Sveen's pound cake made with Crisco, sugar, flour, eggs, and almond extract. I could eat almost an entire cake by myself, especially if coupled with coffee ice cream. It is really a wonder I didn't weigh 400 pounds when I was a kid, considering how much I ate. Then there was the whole tunnel of fudge, which was tasty. And the crunch of pecans interspersed throughout the cake made for a nice contrast.
Maddy took the leftover cake, which had kind of rolled over in the cake carrier, to school. Apparently the people at school declared it "weird" and "too sweet." But they ate it.
I don't think it was weird. And all of Maida's stuff is "too sweet." That is the hallmark of a Maida Heatter dessert.
So apples, doughnuts and cake. I liked the cake. The apples -- not so much. The doughnuts -- well, I never like doughnuts.
Moving on.
Alicia has not been baking. Alicia has not been blogging. Alicia has let the battery run out on her camera and doesn't even remember how to take a picture.
So my posts will definitely not be so entertaining as Maria's. But if I don't write about what I've been doing, I will get even further behind in the race through Maida's book, so I better at least write about what I HAVE accomplished!
American Beauty Apples
At the beginning of January, my friend and co-GS leader Lisa asked me if I wanted to participate in the 3-Day Breast Cancer walk. Of course I said yes. I would never pass up an opportunity to walk 60 miles. Now if I didn't have to raise $2,300 it would be perfect. Of course Natalie wants to do it too. So make that $4,600. And Maddy is considering coming home from college for that weekend too. So that will be $6,900. Hmm.
Even though the walk isn't until mid-November, we decided to start our training with a 5-mile walk around Lake Miramar on the second weekend in January. The night before the walk, I made the American Beauty Apples.
As pointed out by Maria, things have changed since Maida wrote the book. I do recall being able to purchase boxes of highly sweetened raspberries. I couldn't find them -- even though I went to a questionable market which carries old-fashioned things. I did find a bag of "sweetened" raspberries however, so figured they would be good. And I don't think Rome Apples exist anymore. I bought some expensive type of apple called Honey Gold which looked very similar to what I remember Rome Apples looking like (very round and very red.) 6 Honey Gold apples set me back $12!
I was not a fan of this recipe. It involved coring apples, which is a job that I consider truly awful. The core never seems to come out cleanly, so there are always little seeds and stuff stuck in the apple after you are done. And then you still have that little butt end of the apple left, and if you get it in your mouth while you are eating the apple it is a most unpleasant experience. And then you had to thaw the raspberries and shove them through a sieve, which took FOREVER. I realized, after I was done, that I should have used the food mill. Instead, I got carpal tunnel syndrome mashing the berries through the super fine sieve I have. Not too much fun.
The baking of these apples also required a lot more work than I enjoy, because I kept having to open the oven, take the apples out, "baste" them, and put them back in. This continued for a while until the red raspberry puree had congealed around the apples. The apples looked quite spectacular actually. Of course, I didn't take a picture of them, so you have to take my word for it.
I think of baked apples as something that you eat hot. But Maida specified that these apples were to be eaten cold. I left them on the counter to cool, but then forgot about them and went to bed. Fortunately Maddy spotted them on the counter before she went to bed and shoved them into containers and put them in the refrigerator. Good job Maddy.
Next morning was our training walk. When we got up in the morning, I had received a text message saying that the walk was going to begin 1/2 hour earlier than I thought it was going to start. AAAAH! Maddy, Natalie and I threw on our clothes, washed our faces and brushed our teeth, and shoved a couple apples into bowls for eating in the car while we rushed to Lake Miramar.
The apples tasted like cold applesauce covered in raspberry jam. I like applesauce. I like raspberry jam. But I apparently don't like the combination. They were alright, but nothing to write home about (or even to blog about.). I ended up throwing away 4 of the 6 apples (so $8 worth of apples). I couldn't get myself to sell them to anybody else. I'm hoping there aren't anymore baked apple recipes in the cookbook. I haven't looked yet.
Doughnuts
I made the doughnuts on January 24. I was determined to make the doughnuts that weekend. I had told the girls I was going to be making doughnuts, and that was definitely going to happen. I didn't get to it on January 23 because I ended up running all over San Diego trying to buy Maddy a Mac laptop at the "educational discount" price. That was a complete nightmare. By Saturday evening, I was exhausted and didn't feel like doing anything else. When Cassandra suggested that I should probably start the doughnuts that night, because "they might take a while," I told her that I would make them on Sunday. I didn't even look at the recipe. Probably because I knew she was right.
So when Sunday morning dawned, and I looked at the recipe, I discovered that Cassandra was, in fact, right. These doughnuts require a great deal of downtime. If I had started on them the night before, I would have been pulling the dough out of the refrigerator and cutting out doughnuts for their final rise. Instead, I was boiling potatoes.
My first sign that things were not going to go well with the doughnuts was that the yeast in the measuring cup really didn't rise too far. Nope. Not even close to double. But it did rise a little bit. That's what I kept telling myself. And the package wasn't expired. And I was NOT going to go out and buy new yeast. I got through the whole potato ricing, mixing, kneading process (on my new Roul Pat, which is the best cooking thing I have ever purchased in my life), and stuffed the bowl of dough into the oven with the light on so it could rise.
At that point, Pete suggested that we all pile into the car and drive up to the snow. In San Diego, this is a big event. People pull out the sleds from the mothballs, load up coolers, bring chairs and tables, and drive to the snow in droves. We just don't get snow that often. It had been snowing quite a bit that week in the mountains, and everything we heard said that you needed chains. I didn't have chains. So while Pete drove off to find chains, I took Maddy to the mall (an hour before it even opened) because she had decided to go to the mall instead of to the snow. A decision which I still do not understand.
When I got back from the mall, I looked at the bowl of dough. It really had not budged an inch. But I told myself it had risen a little bit, maybe, and "punched" it down (it didn't take very much effort to get it to go down . . .) and put it in the refrigerator for the "curing" phase.
And we went up to the snow. You didn't need chains. And there were about a million people up there. Thank god we chose to drive through Julian because the other road to the snow was backed up about 20 miles. We had a blast! We didn't have sleds in mothballs, so we just had a giant snowball fight.
When we got back from the snow, I pulled that bowl of dough out of the refrigerator and Sam and I cut out the doughnuts. I put the doughnuts onto cookie sheets and put them back into the oven to rise.
There was a little movement. Maybe. It was now an hour past the time when I was supposed to get the girls back to Stuart (he had given me permission to get them back late due to the doughnuts). I pulled the really super flat doughnut circles out of the oven and started frying them. My oil was apparently too hot, because they came out of the oil VERY BROWN. But they were puffy.
It was then I realized that I had no powdered sugar and could not make the glaze. Using Maria's technique, I just rolled the hot doughnuts in sugar.
So my doughnuts looked like the plain cake doughnuts they sell at doughnut shops covered in sugar. They were not large and puffy. They were kind of low and flat and really brown.
But apparently they were good. I forgot one part of this story. I hate doughnuts. I won't even eat a doughnut hole. Everybody else, though, said they were tasty. I gave almost all of them to the girls and don't know what happened to them. I brought the rest to work, and know that Ben ate at least one. He said it was like a Beignet. I guess that's good praise from a boy from Louisiana.
Big Daddy Cake
I made this one last Friday night. The Girl Scout troop was going camping and I recall Maria saying that this was a good cake to make if you have a lot of people to feed. It wasn't a LOT of people, but more than usual.
This cake is pretty fun to make, but uses a lot of butter. Kind of a scary amount, actually. And I was thinking my chocolate bars were 3 oz, and so used two of them to make up the 6 oz I needed for the tunnel of fudge. Oops. They were 4 oz. 8 oz. of chocolate in the tunnel of fudge, making for an even fudgier tunnel.
Although I buttered my pan and covered it with pecan dust, the cake did not want to come out of the pan on Friday night after the requisite cooling period. Because I started on the cake after work, and it takes a long time to bake, I had already stayed up way later than I wanted to. So I just left the cake upside down on the cake plate hoping that the forces of gravity would slide the cake out of the pan. No such luck.
So Saturday morning, I was faced with one of those situations where you know you need the cake to come out of the Bundt pan, you know it is almost impossible to get stuck cakes out of Bundt pans due to all the nooks and crannies in such pans, and you want a perfect looking cake to take a picture of. Oh -- that would be Maria, because I have stopped taking pictures for some reason. But I did want a perfect cake anyway.
I finally settled on my flexible cake frosting spatula, which I slowly worked around the cake. After about 20 minutes of this (20 minutes which I should have spent packing and getting out camping supplies and chopping vegetables and things in preparation for the camping trip), I got the cake out in one beautiful piece. Patience is a virtue. Just not my virtue.
Now 20 minutes behind on my preparations for the camping trip, I enlisted the support of my 3 able-bodied children to do things such as chop potatoes, clean out the car, and restock my camp kitchen, and made the glaze for the cake. This time I used the proper amount of chocolate, but it still looked like a lot of glaze. Cake done, I helped pack of the car and hit the road to Lake Perris. Which I have decided is one of my favorite campgrounds -- if you go in January.
We broke the cake out during the late afternoon and everybody had slices -- even Pete, who hates desserts. Everybody seemed to like the cake. Especially Maddy and I, who had more the next day for lunch. After skydiving. Ok, ok. Indoor skydiving. Really works up an appetite, let me tell you.
I liked this cake. The cake part reminded me of my favorite cake when I was a kid -- Rae Sveen's pound cake made with Crisco, sugar, flour, eggs, and almond extract. I could eat almost an entire cake by myself, especially if coupled with coffee ice cream. It is really a wonder I didn't weigh 400 pounds when I was a kid, considering how much I ate. Then there was the whole tunnel of fudge, which was tasty. And the crunch of pecans interspersed throughout the cake made for a nice contrast.
Maddy took the leftover cake, which had kind of rolled over in the cake carrier, to school. Apparently the people at school declared it "weird" and "too sweet." But they ate it.
I don't think it was weird. And all of Maida's stuff is "too sweet." That is the hallmark of a Maida Heatter dessert.
So apples, doughnuts and cake. I liked the cake. The apples -- not so much. The doughnuts -- well, I never like doughnuts.
Moving on.
Sunday, January 31, 2010
8 (no, make that 5)-hour cheesecake
Welcome to my new, improved kitchen in Pontlevoy! Just a couple of blocks away from the old place, but oh so much better in terms of space and modern conveniences! Yes, it's messy, but have a look:
 Big kitchen table for prepping and eating at.
 Gas stove and electric oven. Lots of appliances. Even a dishwasher! Not much counter space, but whatever.
So my first Maida dessert in this kitchen was the 8-hour cheesecake. By the way, Maida's seeing a bit of a revival: David Lebovitz did a nice tribute to her in his blog today (and please, whatever you do, make those popovers!! They are super easy and irresistible.). And I found through his blog that another woman blogged through Maida's cookie book from 2005-7. Very fun.
OK, so the cheesecake. This is a recipe that Maida adapted from a recipe written by Andrew Schloss, and it involves baking your cheesecake at a very low temperature (200 F or 95 C) for a very long time. I was worried about it because I wasn't sure yet how reliable my oven was going to be or how this all would work out. And how would I know it was done, aside from the 8-hour cooking time? Through an Internet search, I found that some people put their cheesecakes in the oven, went to bed, and woke up the next morning to a brown and rubbery disk. Their advice: bake the cheesecake during the day and check on it after 4 hours or so; it will be done at about 180 F.
This turned out to be an excellent suggestion: I put my cheesecake in the oven at 2 and it was ready at about 7. Which was perfect because I actually needed the oven to prepare dinner. And you'll see that it's white and creamy and mostly everything a cheesecake should be.
 OK, here are the ingredients. You see that this is a pretty straightforward recipe, aside from the baking technique. The French make this stuff called "fromage à tartiner" (spreadable cheese) which is pretty much cream cheese. I got 5 packs of it and still needed to add about 2 oz. of crème fraîche to get to the 2 lbs. of cream cheese required. The vanilla is not pictured here. And that bottle of Cognac was empty when the cheesecake went in the oven, and I don't drink Cognac...
 Here's the cheesecake on a pretty cake plate. Note its firm white creaminess. When I say it's almost everything a cheesecake should be, I mean that it's crustless. I like a little crunchiness with my cheesecake. Fortunately, I had some crunchy spice cookies in my purse (they come with coffee here), which Julia and I crumbled up and used as ersatz crust. That made a perfect cheesecake experience.
 Mmmm...cheesecake on a plate, ready to be eaten. This is about how much is left, less than 24 hours after I first served it.
Here's the recipe. Plan your day around it!
8-hour cheesecake
2 lbs. cream cheese, room temp
1 heaping c. (7.5 oz.) sugar (in a strange twist, I felt that this recipe needed more sugar than called for!)
2 T. (1 oz.) vanilla extract (yes, that's right!)
2 T. (1 oz.) brandy
2 T. (1 oz.) dark rum
5 eggs, room temp
Graham cracker/cookie crumbs
Heat your oven to 200. Get out a one-piece cheesecake pan or a deep cake pan or a soufflé dish and butter it. You'll also need a large roasting or sheet pan to put the cheesecake pan in. Beat the cream cheese until it's smooth and fluffy, scraping the bowl and beaters to be sure. Then add the sugar, vanilla, brandy, and rum and beat until incorporated. Now add the eggs, one at a time, beating until each is incorporated. Pour this mixture into the cheesecake pan. Put the cheesecake pan into the roasting pan and carefully pour hot water into the roasting pan until you have a couple inches of water. Then carefully put all of this into the oven and set the timer for about 4 hours. Go about your business. When 4 hours have gone by, assess your cheesecake. Does it look dry on top? Is it not too jiggly? Is its temp 180? Does the thermometer come out clean? If you can answer yes to all these questions, your cheesecake is probably ready. If not, let it go another hour or so, checking every once in a while.
Once you feel good about the doneness of the cheesecake, take it out of the roasting pan and let it sit at room temperature for a while until it is completely cool. Then unmold it onto a plate and refrigerate it for a few hours or overnight. Serve with or without cookie crumbs sprinkled on top. This should serve at least 8, unless one of your guests is Claire, in which maybe 5 is a better bet.
 Big kitchen table for prepping and eating at.
 Gas stove and electric oven. Lots of appliances. Even a dishwasher! Not much counter space, but whatever.
So my first Maida dessert in this kitchen was the 8-hour cheesecake. By the way, Maida's seeing a bit of a revival: David Lebovitz did a nice tribute to her in his blog today (and please, whatever you do, make those popovers!! They are super easy and irresistible.). And I found through his blog that another woman blogged through Maida's cookie book from 2005-7. Very fun.
OK, so the cheesecake. This is a recipe that Maida adapted from a recipe written by Andrew Schloss, and it involves baking your cheesecake at a very low temperature (200 F or 95 C) for a very long time. I was worried about it because I wasn't sure yet how reliable my oven was going to be or how this all would work out. And how would I know it was done, aside from the 8-hour cooking time? Through an Internet search, I found that some people put their cheesecakes in the oven, went to bed, and woke up the next morning to a brown and rubbery disk. Their advice: bake the cheesecake during the day and check on it after 4 hours or so; it will be done at about 180 F.
This turned out to be an excellent suggestion: I put my cheesecake in the oven at 2 and it was ready at about 7. Which was perfect because I actually needed the oven to prepare dinner. And you'll see that it's white and creamy and mostly everything a cheesecake should be.
 OK, here are the ingredients. You see that this is a pretty straightforward recipe, aside from the baking technique. The French make this stuff called "fromage à tartiner" (spreadable cheese) which is pretty much cream cheese. I got 5 packs of it and still needed to add about 2 oz. of crème fraîche to get to the 2 lbs. of cream cheese required. The vanilla is not pictured here. And that bottle of Cognac was empty when the cheesecake went in the oven, and I don't drink Cognac...
 Here's the cheesecake on a pretty cake plate. Note its firm white creaminess. When I say it's almost everything a cheesecake should be, I mean that it's crustless. I like a little crunchiness with my cheesecake. Fortunately, I had some crunchy spice cookies in my purse (they come with coffee here), which Julia and I crumbled up and used as ersatz crust. That made a perfect cheesecake experience.
 Mmmm...cheesecake on a plate, ready to be eaten. This is about how much is left, less than 24 hours after I first served it.
Here's the recipe. Plan your day around it!
8-hour cheesecake
2 lbs. cream cheese, room temp
1 heaping c. (7.5 oz.) sugar (in a strange twist, I felt that this recipe needed more sugar than called for!)
2 T. (1 oz.) vanilla extract (yes, that's right!)
2 T. (1 oz.) brandy
2 T. (1 oz.) dark rum
5 eggs, room temp
Graham cracker/cookie crumbs
Heat your oven to 200. Get out a one-piece cheesecake pan or a deep cake pan or a soufflé dish and butter it. You'll also need a large roasting or sheet pan to put the cheesecake pan in. Beat the cream cheese until it's smooth and fluffy, scraping the bowl and beaters to be sure. Then add the sugar, vanilla, brandy, and rum and beat until incorporated. Now add the eggs, one at a time, beating until each is incorporated. Pour this mixture into the cheesecake pan. Put the cheesecake pan into the roasting pan and carefully pour hot water into the roasting pan until you have a couple inches of water. Then carefully put all of this into the oven and set the timer for about 4 hours. Go about your business. When 4 hours have gone by, assess your cheesecake. Does it look dry on top? Is it not too jiggly? Is its temp 180? Does the thermometer come out clean? If you can answer yes to all these questions, your cheesecake is probably ready. If not, let it go another hour or so, checking every once in a while.
Once you feel good about the doneness of the cheesecake, take it out of the roasting pan and let it sit at room temperature for a while until it is completely cool. Then unmold it onto a plate and refrigerate it for a few hours or overnight. Serve with or without cookie crumbs sprinkled on top. This should serve at least 8, unless one of your guests is Claire, in which maybe 5 is a better bet.
Saturday, January 16, 2010
Miami Beach Sour Cream Cake
One of the first things I knew I would need for my kitchen in France was a mixer. There are a lot of baked goods you can make successfully with your bare hands, a wooden spoon, and a good bit of elbow grease, but I just don't have the elbow grease for certain items coming down the pike. And this cake, the Miami Beach Sour Cream Cake, was one of those things. So I ordered a mixer.
Has anyone ever mentioned that Europe, and probably France in particular, is expensive? It is. There are some things, like wine and flowers and "gourmet" ingredients that are normal here, that are cheaper here. But in general, more expensive. And electric appliances are up there. A Kitchenaid is 500 Euros, which I guess is about $750. That's obviously not happening. So I looked for a decent hand mixer and found a nice Siemens for about $60 on Amazon. I was so excited about my new, expensive purchase!

But right after I got the mixer, I found out that we're going to move to a different house next month! A house with a big kitchen and lots of equipment! Including a mixer, or so I was told. And I could borrow some stuff now, if I wanted. I wanted. I went and got the "mixer," which was a beater attachment on a stick blender. Well, I thought, this could still work. And I could send back my mixer, which I hadn't even opened.
Wrong! That mixer could maybe beat eggs, but working through even relatively soft butter and almond paste was a big chore for it. I started to smell hot motor. And I realized that I was going to have to bite the bullet and get out the expensive machine if this cake was going to work.
Long story short: mixer works well, but it's still definitely no Kitchenaid. I beat and beat until my arms were sore, but I still didn't achieve the light fluffiness I thought I should have. Nevertheless, this is a delicious cake. Though mine isn't fluffy, it's not heavy either: it's moist and tender and has a delicious almond taste. I served it for dessert last night after Julia arrived from Paris, and about half is gone less than 24 hours later. Worth $60? Well, not for one cake. But I hope that the cost will seem like less as I use the mixer over time.
 Thought I'd do a "cast of characters" photo like Pioneer Woman (please ignore how much prettier her pictures are) with my French ingredients. Quick: can you find the American import?
 Golden brown and delicious.
 Rental house oddities: no mixer, but a very nice cake stand!
 Tender, not fluffy. Yum!
Here's the recipe. If you have a heavy-duty mixer, give it a special thank-you pat as you make this:
Miami Beach Sour Cream Cake
About 2/3 c. almonds, ground to a powder
8 oz. (2 sticks) butter, room temperature
1/4 t. baking soda
1/4 t. salt
3-1/2 oz. almond paste (this usually comes in a little tube from Odense)
1/2 t. almond extract
Grated rind of 1 lemon
2-1/3 c. (I used 2 c., or 14 oz.) sugar
6 eggs, separated (put whites in a medium bowl)
1 c. (8 oz.) sour cream (I used crème fraîche)
3 cups (10 oz.) "twice-sifted" cake flour (I have to say I only sifted once all together.)
Heat the oven to 300. Butter a tube pan (I used a Bundt pan because that's what I had) even if it's nonstick, and coat the butter thickly with the powdered almonds. Beat the butter with the baking soda, salt, and almond paste until fluffy. Then add the almond extract and lemon zest and beat a bit more. Gradually add in the sugar and beat a couple minutes more. Then add the egg yolks and beat that a couple of minutes more. Thank your mixer. On low speed, or by hand, mix in half the sour cream, then sift in half the flour, then repeat. In a clean bowl with clean beaters, whip the egg whites until they're stiff. Be careful because apparently egg whites without any sugar or anything overbeat easily. Fold the egg whites into the cake dough in about 3 additions--the batter is very stiff. Spoon into the prepared pan, tap or twist it to remove the air bubbles, and put it in the oven. Bake for 90 minutes (check after an hour--mine was done in 1 hour 10 minutes) or until a tester comes out clean. Let stand for 20 minutes, then invert onto a cake plate. Well, really, you should invert onto a rack, but I just put it on the cake plate and there was no harm done. Serve and enjoy as is.
Has anyone ever mentioned that Europe, and probably France in particular, is expensive? It is. There are some things, like wine and flowers and "gourmet" ingredients that are normal here, that are cheaper here. But in general, more expensive. And electric appliances are up there. A Kitchenaid is 500 Euros, which I guess is about $750. That's obviously not happening. So I looked for a decent hand mixer and found a nice Siemens for about $60 on Amazon. I was so excited about my new, expensive purchase!

But right after I got the mixer, I found out that we're going to move to a different house next month! A house with a big kitchen and lots of equipment! Including a mixer, or so I was told. And I could borrow some stuff now, if I wanted. I wanted. I went and got the "mixer," which was a beater attachment on a stick blender. Well, I thought, this could still work. And I could send back my mixer, which I hadn't even opened.
Wrong! That mixer could maybe beat eggs, but working through even relatively soft butter and almond paste was a big chore for it. I started to smell hot motor. And I realized that I was going to have to bite the bullet and get out the expensive machine if this cake was going to work.
Long story short: mixer works well, but it's still definitely no Kitchenaid. I beat and beat until my arms were sore, but I still didn't achieve the light fluffiness I thought I should have. Nevertheless, this is a delicious cake. Though mine isn't fluffy, it's not heavy either: it's moist and tender and has a delicious almond taste. I served it for dessert last night after Julia arrived from Paris, and about half is gone less than 24 hours later. Worth $60? Well, not for one cake. But I hope that the cost will seem like less as I use the mixer over time.
 Thought I'd do a "cast of characters" photo like Pioneer Woman (please ignore how much prettier her pictures are) with my French ingredients. Quick: can you find the American import?
 Golden brown and delicious.
 Rental house oddities: no mixer, but a very nice cake stand!
 Tender, not fluffy. Yum!
Here's the recipe. If you have a heavy-duty mixer, give it a special thank-you pat as you make this:
Miami Beach Sour Cream Cake
About 2/3 c. almonds, ground to a powder
8 oz. (2 sticks) butter, room temperature
1/4 t. baking soda
1/4 t. salt
3-1/2 oz. almond paste (this usually comes in a little tube from Odense)
1/2 t. almond extract
Grated rind of 1 lemon
2-1/3 c. (I used 2 c., or 14 oz.) sugar
6 eggs, separated (put whites in a medium bowl)
1 c. (8 oz.) sour cream (I used crème fraîche)
3 cups (10 oz.) "twice-sifted" cake flour (I have to say I only sifted once all together.)
Heat the oven to 300. Butter a tube pan (I used a Bundt pan because that's what I had) even if it's nonstick, and coat the butter thickly with the powdered almonds. Beat the butter with the baking soda, salt, and almond paste until fluffy. Then add the almond extract and lemon zest and beat a bit more. Gradually add in the sugar and beat a couple minutes more. Then add the egg yolks and beat that a couple of minutes more. Thank your mixer. On low speed, or by hand, mix in half the sour cream, then sift in half the flour, then repeat. In a clean bowl with clean beaters, whip the egg whites until they're stiff. Be careful because apparently egg whites without any sugar or anything overbeat easily. Fold the egg whites into the cake dough in about 3 additions--the batter is very stiff. Spoon into the prepared pan, tap or twist it to remove the air bubbles, and put it in the oven. Bake for 90 minutes (check after an hour--mine was done in 1 hour 10 minutes) or until a tester comes out clean. Let stand for 20 minutes, then invert onto a cake plate. Well, really, you should invert onto a rack, but I just put it on the cake plate and there was no harm done. Serve and enjoy as is.
Wednesday, January 13, 2010
Aren't you supposed to bake during the holidays?
I just looked back, and realized the last time I posted anything to this blog was in November. That's pretty sad. It is even more sad to realize that during that period of time, I have only made two items that I can even blog about! I can blame many factors, but the primary culprits are: 1) my diet; and 2) my time constraints. But probably mostly my diet.
I didn't have to move to France right after Thanksgiving, so I really don't have very much to complain about. But the holidays bring their own form of craziness, which I cannot even begin to replicate in writing. We did find time during the holidays to bake cookies -- but we didn't use Maida's recipes. Since we were only making 4 types of cookies (one for each of us) we were looking for very traditional Christmas cookies -- sugar cookies, peanut butter kisses, shortbread, and a very sad (but tasty) experiment in lace cookies.
I did, however, get a chance during the holiday rush to make the Red Beet Cake. I don't even want to go back to figure out how long ago it was that Maria made the Red Beet Cake. I made it for Natalie's "birthday party," which was really a fun-filled trip to LA. I made the Red Beet Cake on December 11, to be exact.
I don't have any pictures. I was hoping for video (which I will write about in a minute), but it has not come through. The cake was very simple, although the can of beets was a little short in the weight department. I think Maria mentioned that. I didn't do anything to make up for it. I made the cake in a transportable rectangular cake pan I have on Friday night. I didn't make the frosting until Saturday morning. I slapped the frosting on the cake, stuck the cake into the carrier, threw in an ice pack (because the cake is supposed to be refrigerated), and we went on our trip to LA.
We did have a lot of fun in LA for Natalie's birthday. It was pouring rain. I mean pouring. All of our planned activities involved being outside. Lunch at a sidewalk cafe (only sprinkling at that point). Cupcakes at Sprinkles (raining pretty good -- and Sprinkles' has virtually non-existent indoor seating/standing room). 3 hour scavenger hunt along Rodeo Drive (pouring -- we looked like we had jumped into a pool and then started roaming around Rodeo Drive). Dinner at Ashton Kucher's restaurant, which we had to walk to (still raining, and no Ashton in sight). Movies -- which we also had to walk to (raining on the way/no rain on the way back). With all the food and rain -- we never cut into the cake. Or put it into the refrigerator at the hotel.
Next day -- brunch at the Magic Castle. Of course this day we had no outdoor activities planned and it was beautiful and sunny. Typical. Very late brunch followed by a magic show. Still not hungry for cake and didn't get back to SD until late afternoon. So we never actually cut into that cake. I left it with Maddy to take to school.
On Monday, Maddy forgot about the cake. I don't know if it ever even got put into the refrigerator. But Monday afternoon, Maddy brought some friends home for a school project -- filming a "how to" video about how to bake a cake. Apparently, the boy in charge of this project decided to make the cake recipe on the back of the Hershey's Cocoa can. I wasn't there, so do not know about all the mistakes he made. But I can assure you, there were many because I saw the finished project. The finished cake was about 1/2 inch high, light in color with dark colored specks throughout. It didn't even look fully cooked, and was really pretty nasty looking. This is not, however, the cake which appears in the video as the finished project. As in most cooking shows, the film depicts another cake for the finished project -- my Red Beet Cake. I asked for the video. If I ever get a copy, I'll post it.
After filming the cake, the girls ate some of it. They declared it delicious. Maddy said that the frosting was "the best frosting I've ever tasted." Pretty good for 3 day old, non-refrigerated frosting. Maddy took the remainder of the cake to school on Tuesday, where it was polished off. I never tasted it at all -- except for the frosting, which really is pretty amazing.
It's January now. I have the best of intentions. Training for Kilimanjaro in September, 3-Day Breast Cancer walk in November, Half Dome in June or July, and maybe the Grand Canyon or Zion Narrows in April. I should be able to burn off the calories . . .
I didn't have to move to France right after Thanksgiving, so I really don't have very much to complain about. But the holidays bring their own form of craziness, which I cannot even begin to replicate in writing. We did find time during the holidays to bake cookies -- but we didn't use Maida's recipes. Since we were only making 4 types of cookies (one for each of us) we were looking for very traditional Christmas cookies -- sugar cookies, peanut butter kisses, shortbread, and a very sad (but tasty) experiment in lace cookies.
I did, however, get a chance during the holiday rush to make the Red Beet Cake. I don't even want to go back to figure out how long ago it was that Maria made the Red Beet Cake. I made it for Natalie's "birthday party," which was really a fun-filled trip to LA. I made the Red Beet Cake on December 11, to be exact.
I don't have any pictures. I was hoping for video (which I will write about in a minute), but it has not come through. The cake was very simple, although the can of beets was a little short in the weight department. I think Maria mentioned that. I didn't do anything to make up for it. I made the cake in a transportable rectangular cake pan I have on Friday night. I didn't make the frosting until Saturday morning. I slapped the frosting on the cake, stuck the cake into the carrier, threw in an ice pack (because the cake is supposed to be refrigerated), and we went on our trip to LA.
We did have a lot of fun in LA for Natalie's birthday. It was pouring rain. I mean pouring. All of our planned activities involved being outside. Lunch at a sidewalk cafe (only sprinkling at that point). Cupcakes at Sprinkles (raining pretty good -- and Sprinkles' has virtually non-existent indoor seating/standing room). 3 hour scavenger hunt along Rodeo Drive (pouring -- we looked like we had jumped into a pool and then started roaming around Rodeo Drive). Dinner at Ashton Kucher's restaurant, which we had to walk to (still raining, and no Ashton in sight). Movies -- which we also had to walk to (raining on the way/no rain on the way back). With all the food and rain -- we never cut into the cake. Or put it into the refrigerator at the hotel.
Next day -- brunch at the Magic Castle. Of course this day we had no outdoor activities planned and it was beautiful and sunny. Typical. Very late brunch followed by a magic show. Still not hungry for cake and didn't get back to SD until late afternoon. So we never actually cut into that cake. I left it with Maddy to take to school.
On Monday, Maddy forgot about the cake. I don't know if it ever even got put into the refrigerator. But Monday afternoon, Maddy brought some friends home for a school project -- filming a "how to" video about how to bake a cake. Apparently, the boy in charge of this project decided to make the cake recipe on the back of the Hershey's Cocoa can. I wasn't there, so do not know about all the mistakes he made. But I can assure you, there were many because I saw the finished project. The finished cake was about 1/2 inch high, light in color with dark colored specks throughout. It didn't even look fully cooked, and was really pretty nasty looking. This is not, however, the cake which appears in the video as the finished project. As in most cooking shows, the film depicts another cake for the finished project -- my Red Beet Cake. I asked for the video. If I ever get a copy, I'll post it.
After filming the cake, the girls ate some of it. They declared it delicious. Maddy said that the frosting was "the best frosting I've ever tasted." Pretty good for 3 day old, non-refrigerated frosting. Maddy took the remainder of the cake to school on Tuesday, where it was polished off. I never tasted it at all -- except for the frosting, which really is pretty amazing.
It's January now. I have the best of intentions. Training for Kilimanjaro in September, 3-Day Breast Cancer walk in November, Half Dome in June or July, and maybe the Grand Canyon or Zion Narrows in April. I should be able to burn off the calories . . .
Subscribe to:
Posts (Atom)