Friday, July 15, 2011

Grand Marnier Strawberry Soufflé

We're back home in France, and there's so much to catch up on--the mail, the shopping, the unpacking, the blog.

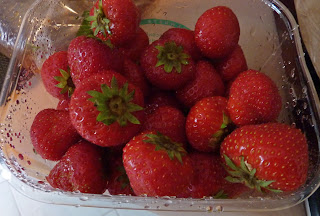
This recipe is a little something that I baked up the day before we left for London and then California. I figured that strawberries wouldn't be in season anymore when we got back, so I had better go ahead and make this strawberry dessert. And I had nothing more important to do, like, say, pack or clean the apartment.
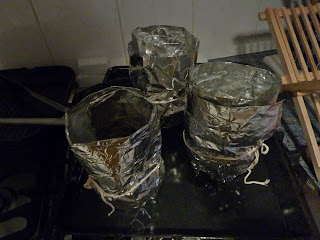
The challenge with this recipe was the little aluminum foil collars. I couldn't figure out how they worked, but fortunately, Sami came to my rescue and made them for me after studying Maida's descriptions. As you can see from the lighting, we made these pretty late at night. Really late, since it gets dark around 10:30 in July.

The soufflé itself is really quite simple--just whipped egg whites with strawberry purée folded in. You're also supposed to put a piece of cake or something in each soufflé dish to soak up the extra juices (and Grand Marnier). I used a croissant that I happened to have sitting in the freezer, and that worked fine.

This was a light, pretty pink dessert--not my very favorite because I don't much like cooked strawberries, but still very elegant for the amount of effort it takes. It's also almost not sweet enough--kind of amazing for a Maida dessert.
Here's the recipe. Make it when the strawberries are delicious and you're feeling crafty.

Grand Marnier Strawberry Soufflé

2 lbs. strawberries, washed and hulled (you won't need all of them)
1/2 c. (3.5 oz.) + 1 T. sugar
Grand Marnier or Cointreau
1-1/2 t. lemon juice
Ladyfingers, cake, sweet bread, or croissant
7 egg whites
1/8 t. salt

Butter six 5-oz. soufflé dishes (mine were more like 7-8 oz, and they were fine). To make collars for them, call your husband. Or if that fails, tear off six 6-inch lengths of aluminum foil. Fold in half the long way, shiny side out. Butter one half of the foil so that the part that is above the soufflé dish is buttered. Carefully wrap the pieces of foil, buttered side up and in, around the dishes; wrap a piece of twine around each dish and tie it carefully and tightly to make the foil secure (this is best done as a team effort). Sprinkle each dish with about a teaspoon of sugar and do your best to distribute that sugar evenly around the dishes/foil. Set the prepared dishes on a jelly roll or sheet pan and take a deep breath. That was the hardest part of the recipe.
Heat the oven to 400.
Take about 7 of the strawberries and slice them into a small bowl. Add 1 T. sugar and 2 T. Grand Marnier and set aside to macerate.
From the remaining strawberries, measure out about 1-1/2 cups (about 6 oz., I'm guessing). Purée them in a blender or food processor, or mash them with a fork. Then pour them through a strainer. You'll want 1 cup of strawberry purée. Add the lemon juice to that. (If you have leftover strawberries, and you probably will, consider slicing them and macerating them like the ones above. They'll make a nice flavor/temperature contrast to the hot strawberries in the soufflé.)
Cut up your cake or what have you into six cubes "about the size of a domino". Basically, it should easily fit into the bottom of the cup. It's there to soak up extra juice/liquor. Spoon
some strawberries and juice into the cups with the cake. Add a bit of extra liqueur to each cup if you'd like. It's kind of hard to work with the foil collars, but do what you can.
Now put the egg whites and the salt in a large mixing bowl. Put the whisk attachment on the mixer and let it go. When the egg whites have become foamy, start gradually pouring in the 1/2 cup of sugar. Then continue beating until the egg whites hold a stiff peak. Take the bowl out of the mixer and gradually and carefully fold the strawberry purée into the egg whites. When you have a nice pink, fluffy mixture, carefully spoon it into the soufflé dishes. Again, it'll be kind of hard to get it in with the collars and such, but if I could do it, so can you. Put the soufflés in the oven (make sure it's on a low enough rack that the collars don't scrape up against the top of the oven) and bake for 18-20 minutes (mine were done after 16). When 15 minutes have gone by, make sure everyone is waiting for dessert. As soon as the timer rings, spring into action. Take the soufflés out of the oven, cut the string, remove the collars, and carefully transfer the soufflés to plates. Rush them to the table and dig in, perhaps with the leftover sliced strawberries. Enjoy the elegant and guilt-free goodness.

Thursday, July 14, 2011

Texas Chocolate Muffins


Ah, home again. Back to French butter and French chocolate and good light in the kitchen. Despite what the date on the blog entry might tell you, I made these in late August, just about first thing upon returning home.


Let's just start with the name of this particular treat: "chocolate" I can definitely agree with: unsweetened + semisweet + cocoa. That's a given. "Texas"? I don't know. Maybe because of the pecans? Maybe because only a Texan could eat one of these babies in one sitting?

"Muffins"? Well, they are baked in muffin form. One of my favorite bloggers has written a very clear differentiation of the muffin and the cupcake for a rather similar recipe, but these aren't either. Basically, they're brownies. Big old muffin-sized brownies.


Not that I'm complaining. I was kind of worried I'd go through brownie withdrawal after finishing the section, and here I am making brownies again! These are really easy to make. And the muffin shape means they stay moist and are easily transportable.

Of course, Sami decided these would be perfect breakfast food, but for me, half of one is a perfect afternoon snack--moist dark chocolate crunchy goodness. I bet they'd be great with ice cream.

Here's the recipe. You really ought to make these now.

Texas Muffins

1 c. (8 oz.) butter
3 T. (0.6 oz.) cocoa
2 oz. unsweetened chocolate
2 oz. semisweet chocolate
Pinch salt
1-1/2 c. (10.5 oz.) sugar (I went for more like 9.5 oz.)
4 large eggs
1 t. vanilla
1/4 t. almond extract
1 c. (4 oz.) sifted flour
2 c. (7 oz.) toasted pecans, broken into pieces (I used about 5 oz. Pecans are precious around here.)

Heat the oven to 350. Line or butter 12 muffin cups, even if they're nonstick.
In a large microwave-safe bowl, preferably one with a spout, melt the butter, cocoa, and chocolates in 30-second intervals, stirring between each. Then stir in the salt, sugar, the eggs one at a time, vanilla, almond, flour, and pecans. Pour this brownie-like mixture into the muffin cups, using a spoon to push and guide it. The batter will fill the cups all the way up, but that's OK.
Bake for 33-35 minutes, or until a toothpick comes out just barely clean. Let them cool, preferably out of the pan, on a rack. Try to justify as a breakfast item.

Wednesday, July 13, 2011

Chocolate Chip-Chocolate Oatmeal Cookies

Like the Colonial Blueberries, I made these cookies late at night (and photographed them with the iPhone) while waiting for Julia and her cousins to come back from Outside Lands. I thought they'd make good road-trip cookies for the cousins returning to San Diego and for us driving down to LA. I was right on both counts.
These cookies were quite popular: they're chocolate-y but not overpoweringly so, and they have a healthy feel from all that oatmeal. You'll notice I tweaked the walnut-to-chocolate ratio, which seemed a bit overpowering to me.

Here's the recipe. Make these when you have a reason to snack.

Chocolate Chip-Chocolate Oatmeal Cookies

1 c. (8 oz.) butter, room temperature
1/2 t. baking soda
1/2 t. salt
1/3 c. (1 oz.) cocoa
1 t. vanilla
1/4 t. almond extract
1-1/2 c. (10.5 oz.) sugar
1 large egg
2 t. instant coffee
1/4 c. hot water (I used 1/4 c. hot coffee for the coffee + water)
1-1/4 c. (5 oz.) sifted flour
1 c. (6 oz.) chocolate chips (I used 8 oz.)
3 c. (9 oz.) quick oats
2-1/2 c. (10 oz.) walnuts, broken into medium pieces (I used 5 oz.)

Heat the oven to 350. Line some cookie sheets with parchment or aluminum foil.
Cream the butter with the baking soda, salt, cocoa, vanilla, and almond extract until it is smooth and fluffy. Gradually beat in the sugar and beat for 2 more minutes. Add the egg and beat another minute. Dissolve the coffee in the water and stir that in, then add the flour, stirring just until incorporated. Remove the dough from the mixer and stir in the chocolate chips, oats, and walnuts by hand.
Drop tablespoonsful of dough onto a long piece of foil or waxed paper. Wet your hands and roll each piece of dough into a ball; put it on a lined cookie sheet and flatten it a bit.
Bake 14-16 minutes; they will come out of the oven soft but will become crisp. Let them cool a bit on the foil before transferring them to a rack.

Colonial Blueberries

This is the recipe that Would Not Be Made. I had planned to make this after two different trips to the fabulous Livermore Farmer's Market, but each time after I got home and started making dinner, I realized that I wouldn't have time to make it. So most of the berries I bought for this recipe were eaten as is, which was fine. For the rest, I got a giant value-pack of non-local blueberries at Safeway.

But finally I told myself, "I need to just go ahead and make this recipe. After all, there are five teenage girls in the house! Someone's going to eat it!"


Having teenagers around is, I find, an excellent reason to bake. Also, when said teenagers are out at a giant outdoor music festival and you're not sure when they'll get home or if they're OK, baking is a soothing activity. Not that I worry about my child and her cousins.

I'm not sure exactly how to classify this dessert. It has the cake and buttery richness of an upside-down cake but is served right-side-up.

I liked the orange-y, boozy cake layer, but I found the fruit part to be too sweet and buttery. I think a tarter fruit like blackberries would be nice, or just the addition of lemon juice to the blueberries. Or you could just cut down on the added sugar after tasting the fruit. And I might cut the butter in half.

This is a terrible iPhone-in-bad-light photo, but it does show how thick the cake layer is compared to the fruit layer. To me that makes it more a cake than a cobbler. Despite all the caveats, I do recommend making this and serving it warm with ice cream.

Here's the recipe. Make it when you get the chance.

Colonial Blueberries

5 cups (1 lb. 4 oz.) blueberries (or blackberries or mixed berries), washed and drained
1 c. (7 oz.) brown sugar (I would use less, depending on how sweet the fruit is)
6 T. (3 oz.) butter (recommend less: maybe 3-4 T.)
1/2 t. cinnamon

Put 3 cups of the blueberries in a heavy 3-quart saucepan with the sugar and butter over low heat. Stir occasionally until the mixture comes to a low boil. Let simmer gently for 3 minutes. Let the mixture cool down for about 10 minutes, then add the remaining 2 cups berries. Pour the mixture into a 3-quart baking dish and sprinkle it with the cinnamon. Set aside while you make the topping.

2/3 c. (5.3 oz) butter, room temperature
2 t. baking powder
1/4 t. salt
1/2 t. vanilla
Finely grated rind of one orange
3/4 c. (5.25 oz.) sugar
2 large eggs
2/3 c. (5.3 oz.) fresh orange juice (grate the rind before you squeeze)
Cognac, bourbon, or more orange juice
1-1/2 c. (6 oz.) flour

Heat the oven to 350. Cream the butter with the baking powder, salt, vanilla, and orange rind until fluffy. Add the sugar and beat another minute or two. Beat in the eggs one at a time, beating well after each addition. Add enough booze or orange juice to the 2/3 c. orange juice to make 3/4 c. (6 oz.) liquid. On low speed add the flour to the creamed mixture in three additions, alternating with the orange juice/booze mixture. Maida says the mixture will probably looked curdled and that that's OK.
Slowly pour the batter over the berries. Maida says it's OK if the batter doesn't cover the berries completely, even though it probably should. Bake for 45 minutes, or until "richly browned" and the batter springs back when gently touched.
Serve warm with ice cream or whipped cream.


Savannah Fig Cake

Spending time at my parents' house in the Bay Area means lots of things: fabulous weather, beautiful surroundings, and great company on the one hand; on the other, a big garage for Sami to tinker in (he's spent the week under his VW bus) and a big kitchen for me to cook and bake in. Fortunately, Dad and Sharmyn don't seem to mind my messes too much, especially when they turn out to be delicious. Like this cake, surprisingly enough.

This cake had some serious strikes against it. For one, the recipe calls for a can of figs in syrup. I suppose I could have driven all around town looking for those Oregon cans, but instead, when Safeway didn't have them, I dropped a wad on a 12-ounce package of fresh figs and decided I would poach them (about 3 cups of water, 1/2 cup sugar, a used vanilla bean, simmer for about 15 minutes). Since the figs weren't uniformly ripe, this meant a bit more texture than the original recipe had.

Once I had the figs done, the cake was a breeze: it's a pretty standard quick cake recipe involving oil (like a carrot or applesauce cake). I used half melted butter because I don't really like the texture of cakes with oil, but the oil keeps the cake moist longer.

You have nuts on the outside of the cake...


...and plenty on the inside as well. Another great thing about being in California: lots of nuts available. At least there are in the freezer here.

So the cake was a breeze, even with the little fig hiccup. The frosting, however, was a bit of a challenge. It requires a candy thermometer because the mixture needs to be taken to exactly 238, and Maida takes pains to note that there's no other way to gauge the proper temperature. Unfortunately, this thermometer, new as it was, does not show fine enough gradations for me to be able to see 238. This was a problem. Bottom line: don't buy this thermometer. Shell out for a good one.

The frosting is a bit odd in several ways: it involves buttermilk and baking soda, so it's very frothy.

Sorry about the overexposed night shots of the frosting. I wanted to get this cake frosted so we could have dessert. So these are the ingredients awaiting their stove time.

About 5 minutes in, the mixture is bubbling quite steadily. But it's not nearly close to temperature.
I should have taken the frosting off the heat BEFORE I took this picture: the frosting overcooked. We called it "hard-ball frosting", and you'll see in the first picture that it's lumpy and hard and funny-looking. So if you attempt this frosting, I highly recommend an accurate, easy-to-read thermometer, and I recommend taking it off the heat just before it actually reaches 238.
After you read all this, you may be wondering, "Should I bother making this cake?" I would say yes, if you like a spicy, moist fruit cake and a yummy caramel icing. It keeps forever even just sitting out on the counter, which it is right now. You just need to hunt down a can of figs and a candy thermometer.
Here's the recipe. Please report in if you have better luck than I did!

Savannah Fig Cake

1 17-oz. can kadota figs in syrup
2 c. (7 oz.) walnuts
2 c. (8 oz.) sifted flour
1 t. baking soda
1/2 t. salt
1 t. cinnamon
1 t. allspice
3 large eggs
1 t. vanilla
1 c. (8 oz.) buttermilk
1 c. (8 oz.) neutral oil
1 c. (7 oz.) sugar
1/2 c. (3.5 oz.) brown sugar

Put the figs in a strainer to drain--you won't need the syrup.
Heat the oven to 350. Butter a bundt pan that holds 11 cups. Grind very fine 3/4 c. (2.6 oz.) of the walnuts; use those to coat the buttered pan. Leave any extra nuts in the bottom of the pan. Chop the remaining walnuts coarsely and set aside.
Sift together the flour, baking soda, salt, cinnamon, and allspice. In the large bowl of an electric mixer (or in a bowl with a whisk), beat the eggs to mix, and then beat in the vanilla, buttermilk, oil, and sugars until well mixed. On low speed add the dry ingredients just until mixed.
Use a knife or scissors to cut the figs into quarters; add them and the remaining walnuts to the batter. Pour the batter into the prepared pan and bake for 50-60 minutes or until a cake tester comes out clean. Cool in the pan for 10-15 minutes, then unmold and cool completely. That was the easy part. Now you'll need to make the icing.

1/2 c. (4 oz.) buttermilk
1 c. (7 oz.) sugar
3/4 c. (6 oz.) butter
1/2 t. baking soda
1 T. light corn syrup
1 t. vanilla

Get out a heavy 2-quart saucepan and butter the sides. Now put the buttermilk, sugar, butter, baking soda, and corn syrup in that pan. Set it over medium-low heat and stir it occasionally with a wooden spoon (brushing off any crystals that form with a wet brush). When it comes to a boil, turn down the heat to low, put in your candy thermometer, and be prepared to be very patient, stirring the mixture occasionally. The mixture will first foam up a lot but will then settle down. Keep waiting and stirring occasionally until the thermometer reaches 238 (after 220, it will turn brown; just keep stirring and be patient). While you're waiting, get out a small to medium-sized bowl, a larger bowl filled with ice and water, and a hand mixer.
As soon as the mixture reaches 238, pour it into the smaller bowl and add the vanilla. Put the bowl inside the larger bowl filled with ice and water and use the hand mixer to beat the mixture at high speed for several minutes until it gets thicker and lighter in color. For me this just took a minute, but my frosting was also overcooked.
Very slowly and evenly pour the icing over the cake--don't let it run off the sides of the cake and onto the plate. Enjoy with perhaps a scoop of vanilla ice cream.

Lattice-Topped Brownies

There's a lot of Potter-mania going on around our place these days. The last movie comes out today, but in the lead-up, of course, the girls and their friends had to watch all seven preceding movies to get in the mood. Julia had a Potter party yesterday with some of her friends--it started here but then moved elsewhere when we had dinner guests arrive.

And of course, whenever there are teenagers in the house, I immediately think, "Great! I can bake something, and they'll eat it!" Thus the Lattice-Topped Brownies.

These were fun to make and easy to eat. Maida warns that "they are not quick and easy," and they certainly do take more time than, say, her All-American brownies.

But they're not a huge project either. It's not like there's marzipan carrots or Swiss buttercream involved, after all. I cheated a bit on cooling times, and these were done within an hour of when I started.
And the end result is totally worth the bit of extra work. You have the buttery crispness of the shortbread playing off against the gooey brownies. And then there's the extra chocolate layer, and the walnuts...

Have I mentioned that this is the last brownie recipe in the book? I'm very sad about that. Maida is the queen of brownies. But I know that there's plenty of chocolate ahead, so I'm not too worried.

Here's the recipe. Make it when you're up for a bit of a project with a fabulous result.

Lattice-Topped Brownies

1-1/2 c. (6 oz.) + 2 T. (0.5 oz.) sifted flour (you'll use these at different times)
2/3 c. (4.6 oz.) sugar
Pinch salt
10 T. (5 oz.) cold butter
1 egg yolk
3 oz. semisweet chocolate, chopped or broken into fairly small pieces

Heat the oven to 400. Line an 8-inch square pan with aluminum foil. Put a bit of butter in it and put the pan in the preheating oven for a minute. Take it out and brush the foil with the butter.
Put the 1-1/2 c. flour, sugar, and salt in a food processor and pulse to mix. Cut the butter into slices or cubes and add to the workbowl. Process until the mixture starts to hold together--this will probably take longer than you expect. Take half the mixture out and knead a bit until it really holds together. Put the dough between sheets of waxed paper and do your best to roll it into an 8-inch square. Mine was not perfect and it didn't matter. Line the foil-lined pan with this dough--make it fit as best you can--and bake for 13 minutes (mine was done after 9) or until beginning to turn brown.
While the bottom crust bakes, make the lattice. To the remaining dough in the food processor add the remaining 2 T. flour and the egg yolk; process until it holds together. Hopefully, you've saved the waxed paper from the bottom crust. Roll the lattice dough out between those two sheets into the best approximation of an 8-inch square you can do. Put the dough, still between the waxed paper sheets, on a plate or cookie sheet and put that in the refrigerator to wait.
As soon as the bottom crust comes out of the oven, sprinkle on the chopped chocolate. Wait a minute or two for it to melt, then use the back of a spoon to spread it evenly over the crust. Let that sit while you make the brownie batter.

1/2 c. (4 oz.) butter
2 oz. unsweetened chocolate
2 t. instant coffee powder
1/4 t. salt
1/2 t. vanilla
1 c. (7 oz.) sugar (I dialed this down to about 6.3 oz.)
2 large eggs
1/3 c. (1.3 oz.) sifted flour
1 c. (4 oz.) walnuts--Maida says to chop them, but I left them in largish pieces and liked them that way

If you still have the oven on, turn it down to 350. Or turn it back on again to 350. In a large microwave-safe bowl, melt together the butter and chocolate. This took me about 1 minute 30 seconds. Stir in the coffee, salt, and vanilla, then the sugar, then the eggs one at a time, then the flour, and then the walnuts. Set the mixture aside for a minute.
Get out your rolled-out dough and cut it with a knife or pizza cutter into 1/2-inch strips. You can use a ruler like Maida or you can be lame like me and do it "by guess and by golly".
Now pour the brownie batter over the chocolate-covered shortbread. Lay half of the lattice strips over the brownies, about 1/2 inch apart, going one way, and then lay the other half going the other way. You don't have to weave these, just lay them perpendicular to each other. It will look pretty good even if you're lame like me.
Put the cake in the oven ("on a high rack") and bake for 35-40 minutes (mine were done at about 25 minutes) or until the lattice strips are golden and a toothpick comes out barely dry (don't stick it down too far; the chocolate layer in the middle might fool you into thinking your brownies aren't done). Let cool completely in the pan. Then unwrap from the foil and cut the brownies into "16 outrageous monsters or 32 more respectable bars". I did the latter. Enjoy these with a friend or two.

Chocolate Mousse Pie


In preparation for vacation, I have been powering through some Maida Heatter recipes, and we seem to be eating our fair share of yummy stuff. This week I've already made this pie and the last (sniff!) brownie on the rotation, and I have everything ready to go to make a soufflé. Apparently I've gone over the edge.
But let's talk about this pie. This one is kind of a first for me, since I almost never make the same thing twice. I have notes in my book that I have made this pie before, probably in college. Chocolate mousse pie was huge in the 80s. And Natalie made this pie for Thanksgiving dinner a couple of years ago, but we never got around to writing about it. So I felt, er, compelled to make this again, just so I could have pictures.
But since this is, after all, chocolate mousse pie, I decided that I should be reasonable and make just a half recipe. And the portions in that recipe seem so much more reasonable: 3 ounces of chocolate, 1 egg, half a cup of cream...OK, chocolate mousse is never reasonable. But it's good, especially with a crunchy crumb crust. And boozy whipped cream.

Let's just say that there were five of us (Julia's friend Alice, who has become a die-hard "Marie K. Hardy" (Maida Heatter) fan, was over) and that this reasonably sized pie disappeared in an unreasonably short span of time.

Here's the recipe. Make half a recipe or make the whole recipe, but make it. And remember to make it the day before you want to eat it!

Chocolate Mousse Pie

1-1/2 c. (6 oz.) chocolate wafer or Oreo crumbs
1 t. instant coffee powder
6 T. (3 oz.) melted butter

Heat the oven to 375. Line a 9-inch pie plate with aluminum foil. Mix together the cookie crumbs, coffee, and butter. Dump into the pie plate and use a measuring cup or your knuckles to press the crumbs on the bottom and part way up the sides of the pie plate. Bake for 10 minutes. Cool, then freeze for at least an hour until completely firm. Take the crust out by the foil, peel off the foil, and then return the crust to the pan. You can now store the crust in the refrigerator or freezer while you make the filling (or until you're ready to use it).

6 oz. good semisweet chocolate (it's the main flavor here--quality matters)
3 large eggs, 2 of which are separated (if you want to halve the recipe, I think one egg is enough--use a bit more cream to compensate if you like)
3 T. (1.5 oz.) dark rum
1 c. (8 oz.) cream

Break up the chocolate and melt it your favorite way--one minute in the microwave does it for me. Let cool a bit. In a large bowl, whisk together the one whole egg and the two egg yolks. In a medium bowl, beat the egg whites until they hold a firm shape. Now whisk the chocolate and the rum into the egg yolk mixture. Pour the beaten egg whites on top of that mixture (ideally to one side) but don't mix it yet. In the same bowl you beat the egg whites in, whip the cream, also until firm but not too stiff. Pour the whipped cream in next to the egg whites on top of the chocolate. Now carefully fold that all together. (This technique is not Maida-approved, but it worked well for me and saved me a lot of dishes.) Pour the mousse over the crust and let it chill overnight. When you're ready to eat some chocolate pie, you'll first want to whip some cream:

1-1/2 c. (12 oz.) whipping cream
3 T. (0.75 oz.) powdered sugar
2 T. (1 oz.) rum
1/2 t. vanilla
Grated or shaved chocolate

Pour the whipping cream, sugar, rum, and vanilla into a chilled bowl and whip it with chilled beaters until firm but not too stiff. Get the pie out of the refrigerator and top it with the cream. You can make it flat or swirly, however you'd like. Top with the shaved chocolate and serve. Enjoy the moment.


Monday, July 11, 2011

Blueberry Cream Cheese Pie

We've been traveling a lot lately, which would explain the dearth of posts. It's not always easy to get into a kitchen and bake when you're in a vacation rental, or even in someone else's house. Still, I managed to get in one dessert in Livermore before we flew to Hawaii.
We had friends and relatives over for potluck involving grilled chicken and cheesy potatoes and salad, and this cream cheese pie--it's really cheesecake, despite the name--perhaps a less impressive cheesecake, but yummy nonetheless.

I had been to the farmer's market to pick up berries and other goodies the day before, and I wanted to use up as many berries as possible. Therefore, this became Blueberry Cream Cheese Pie with Blackberries and Raspberries. Also, I didn't want to buy currant jelly just for this purpose, so I used seedless marionberry jam, and it worked out great.

The pie was much appreciated and quickly devoured. Sami took a picture of "his" piece of pie, which he wasn't able to eat because he was down with a stomach bug.
I like this recipe a lot--though it needs a lot of down time for cooling and chilling, the actual preparation is really easy, and the results are spectacular.

Here's the recipe. Make it now, while berries are still in season.

Blueberry Cream Cheese Pie

1-1/4 c. (5 oz.) graham cracker crumbs (this turns out to be 1 package of crackers)
1 T. sugar
1 t. cinnamon
1/2 t. nutmeg
1/2 t. ginger
Pinch allspice
6 T. (3 oz.) butter, melted
(alternatively: 1 pkg. zwieback
1/4 c. (1 oz.) powdered sugar
6 T (3 oz.) butter)

Heat the oven to 375. Line a 9-inch pie plate with foil. Stir together the graham cracker crumbs, sugar, cinnamon, nutmeg, ginger, allspice, and butter (if you're using a food processor to make the crumbs, just mix it all in the processor). Pat the crumbs in the foil-lined pan to form an even layer on the bottom and as far up the sides as you can go. Bake for 7 minutes. Let cool to room temperature, then freeze at least 1 hour. When the crust is frozen solid, pull it carefully out of the pan by the foil and then carefully peel the foil off. Return the crust to the pan. Keep it at room temperature while you make the filling (especially if you have a glass pan--you don't want it to crack going from frozen to hot!).

12 oz. cream cheese, room temperature
1 t. vanilla
1/2 c. (3.5 oz.) sugar
1/3 c. (2.7 oz.) cream, sour cream, or crème fraîche
2 large eggs

Heat the oven to 350. Beat the cream cheese until smooth. Add the vanilla and sugar and again beat until smooth. Add the cream and then the eggs, one at a time, beating just until smooth but not going for fluffy/airy. Pour the filling in the crust and bake 25 minutes. Let cool to room temperature and then chill at least an hour.

3 cups (12 oz.) fresh blueberries (and/or other berries), washed and picked over (and dry)
About 1/2 c. (5 oz.) red currant (or other red fruit) jelly

Put the jelly in a microwave-safe cup and zap it for about a minute: it should come to a full boil. Immediately brush a thin layer on top of the cheese filling. Put the rest in a large bowl to cool and thicken a bit. When the jelly has begun to set a bit, add the blueberries and fold together carefully until the berries are coated. Spread the berries over the pie. If the jelly doesn't cover the pie between the berries, melt some more and coat the pie. Then chill at least a few hours or overnight.

Sunday, July 10, 2011

Surprise Cakes

This recipe was third in a series of a baking frenzy. I'm sure my family was wondering what was wrong with me (though they didn't complain), but I had good reasons for all the baking. The reason to make this recipe was a tea party at my aunt's house.

My aunt is in her 80s but doesn't look a day over 70 and is the most charming and gracious person you'll meet. We were lucky enough to get to see her and my three cousins and their children at an impromptu tea party that turned into a cocktail party out on her patio. Her house was once my grandmother's house, so we all share a lot of great memories of family gatherings there.

Maida says that these little cakes are perfect for a tea party, and she's right. They're kind of fussy to make, with a crust and a filling and a topping, but they're not difficult.

I had fun with the fillings: I tried two different kinds of jam, and also tried candied ginger and chocolate chips. I think everyone at the party enjoyed the surprise of not knowing what filling they'd get, and since these are small, many were sampled.

There were scones and cake and finger sandwiches and many delicious things at the tea party, but these cakes were the first to completely disappear. My cousin's husband, Bob, was especially fond of them: "What's in these? Butter, right?" That should not be a surprise.

Here's the recipe. Make them for a tea party or just if you want to create something surprisingly delicious.

Surprise Cakes

3/4 c. (3.75 oz.) unsifted flour (I used some whole wheat)
Pinch salt
1/2 t. baking powder
1/4 c. (1.75 oz.) sugar
1/4 c. (2 oz.) cold butter
1 egg yolk
1/4 t. vanilla
2 T. (1 oz.) milk

[Note: I cut the ingredients here in half because I had more than twice the dough I needed.] In a medium to large mixing bowl, whisk together the flour, salt, baking powder, and sugar. Cut in the butter until the mixture looks like coarse crumbs, then stir in the egg, vanilla, and milk. Mix just until the mixture holds together. Wrap in plastic or waxed paper and refrigerate at least an hour.
When you're ready to bake, heat the oven to 425 and butter 24 mini-muffin cups. Cut the dough in half and work with one half at a time, letting the other half wait in the fridge. Roll out the dough to 1/3 inch thick, then cut into 1-1/2 inch circles. You should get 12 circles from each half of the dough. Place a round of dough in each muffin cup, pressing to make a little cup. Maida says not to worry if they're not perfect. (Because she said this, I just rolled the dough into little balls and pressed them into the cups. Worked like a charm.) Now you can fill them:

1/3 c. (about 3.5 oz.) jam or jelly of your choice--Maida recommends currant jelly or orange marmalade; I used blackberry and apricot jam, candied ginger, and chocolate chips
24 walnut halves or a few spoons of finely chopped walnuts

On each round of dough place about 1/2 t. of jam/jelly and a sprinkling of walnuts or a walnut half. Let that wait while you make the top layer.

1/4 c. (2 oz.) butter, room temperature
1/2 t. baking powder
1/4 c. (1.75 oz.) sugar
Scant 1/4 t. almond extract
1 large egg
2 T. (0.6 oz.) flour

In the small bowl of an electric mixer (a hand mixer is probably fine for this), beat the butter and baking powder until fluffy. Add the sugar and almond extract and beat another minute. Add the egg and beat for another minute. Add the flour and beat at low speed until smooth.
Put a teaspoonful of batter in each muffin cup. Be conservative--Maida says there's just enough for all 24 cakes.
Bake the pans side by side for 13-15 minutes. They will be golden with darker rims and the tops will spring back when pressed.
Cool in the pans for 5 minutes, then carefully unmold the cakes onto a rack and turn them right side up.

Friday, July 8, 2011

Mocha Chip Chiffon Cake

Things around here are definitely starting to have a winding-down, vacation-is-coming feel to them. Sure, Sami has to go to work every day and I have editing clients with no understanding of academic integrity, but the girls are out of school, the weather is warm at least one out of two days, and I seem to have time to bake.

This cake followed directly on the heels of the ginger cakes, since they disappeared quickly and without a trace. I've had my eye on this recipe for a while--I love the light richness of chiffon cakes, and I love the combination of chocolate and coffee.

So I chopped some chocolate and separated a bunch of eggs and got right to work. Besides the egg separation, chiffon cakes are a breeze. You just mix egg yolks and oil with the dry ingredients...

...until you have a thick, smooth batter, and then you whip the egg whites and fold the whole mess together.

Note my not-very thorough folding together of whites and batter. It didn't seem to be a problem.

Then you hang the cake upside-down on a wine bottle, hoping to heck that it doesn't tip over (note the new kitchen counter!)

And you dig in! Most of this cake went to a graduation event at the girls' school--the parents put on a big soirée with a giant buffet, music, flowers, etc. The cake was not served at the event, but was there to help fuel all the many volunteers who decorated, cut up fruit, cleaned, hauled, etc. Apparently it was well appreciated--at least the container I sent it in came home empty.
But I got to eat a slice or two and definitely recommend this cake. The coffee flavor isn't as pronounced as I would have liked (I might up the instant coffee a bit), but the texture is divine--like angel food but with a bit more oomph. It does go stale kind of fast, so I recommend serving it soon after making it, or at least keeping it well wrapped.

Here's the recipe. Make it when you have time and many mouths to feed.

Mocha Chip Chiffon Cake

2 c. (8 oz.) sifted flour
1-3/4 c. (12.25 oz.) sugar
1 T. powdered instant espresso (maybe a bit more)
1 T. baking powder
1/2 t. salt
1/2 c. (4 oz.) neutral oil (I used grape seed oil; canola is another good choice)
7 large eggs, separated
1/2 c. (4 oz.) Kahlúa or other coffee liqueur
1/4 c. (2 oz.) cold water
2 t. vanilla
3 oz. semisweet chocolate, cut up into small (1/4-inch) pieces (minichips might work here)
1/2 t. cream of tartar

Heat the oven to 325. Get out an angelfood cake pan--that would be a tube pan with a removable bottom, not nonstick. (If you don't have one, you could see my post about improvising one, although I don't necessarily recommend it...)
You'll need two large mixing bowls: one for your mixer and another one. Put the egg whites in the bowl for the mixer and set aside. Into the other large bowl, sift (I don't normally sift, except for these kinds of cakes) the flour, 1-1/4 cups (8.75 oz.) sugar, coffee, baking powder, and salt. Make a well in these dry ingredients and pour into it, in this order, the oil, the egg yolks, the Kahlúa, the water, and the vanilla. Get out a whisk or rubber scraper and mix together the ingredients until smooth. Stir in the chocolate pieces.
Now it's time to deal with the egg whites: add the cream of tartar to them and beat with the whisk attachment until they get quite foamy. Keep the mixer going while you gradually add the remaining 1/2 cup sugar. You want to beat them until quite stiff--Maida says to beat them a minute longer after they become firm. I just got mine to a stiff peak and that seemed to work fine.
Now you need to fold the egg yolk mixture into the egg whites. Do it about a quarter at a time, folding with your biggest rubber scraper and trying not to be too thorough at each addition. When all is mixed, pour into the tube pan and bake for 1 hour 10 minutes (mine was done after 55 minutes) or until the top springs back when lightly pressed. The cake will rise a lot and will probably crack. As soon as the cake comes out of the oven, invert it onto a (preferably empty) bottle to cool completely. When it has cooled, use a long knife or spatula to cut around the sides. When you've freed the cake from the sides of the cake pan, you'll then need to cut it out of the bottom of the pan as well. There will probably be a lot of "cook's portion" left on the cake pan.
Slice the cake with a serrated knife and serve.